
- Sakura Dungeon
- Floor Guide Part 1
Dungeon Entrance, level 1
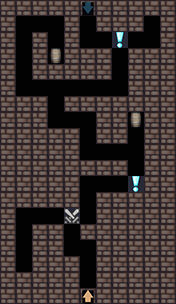
You can ignore the second barrel in the top left since there’s nothing inside, so make your way to the topmost event. If you encounter the rabbit again make sure to capture her.
After seeing the final event, go down to the next level.
Enemies to capture
- Bunny
Items to collect
- 5 Mana Shards
Dungeon Entrance, level 2
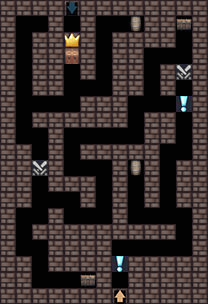
Feel free to warp out and add the rabbit and boar to your party (Don’t buy a new warp stone). Then head back inside to make your way back.
After the first chest make your way down towards the second chest to obtain a Fire Twist scroll, then back north to the second battle. After that, ignore the gate and head for the barrel up north to get a new warp stone. Now go through the gate (Click it twice) and defeat the Slime boss. Then go to level 3.
Enemies to capture
- Boar
Items to collect
- Healing Potion
- Fire Twist Scroll
- Warp Stone
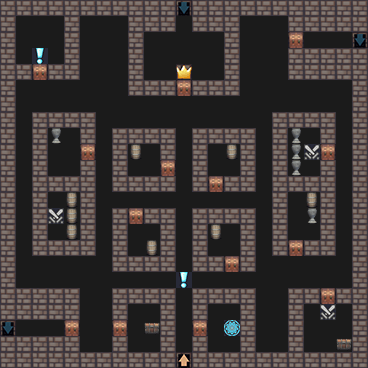
Castle Entrance, level 3
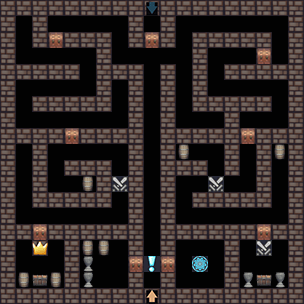
Head forward to get the first event then go through the right door and unlock the teleporter. After that head back to the other door and break all of the vases and barrels to get a healing potion and a small vitality seed. Head back out and go north, then west, through the 2 doors down south and check the barrel for a warp stone. Loop back out of the dead end and continue your way to the battle event. Once defeated, continue down to the last room + boss battle, and open the chest for a fabric scrap.
Warp out or make your way back north to start on the east side of the map, moving around the north wall to go through the first 2 doors and towards the next battle. After completing the battle move further down to enter the last room, awaiting another big battle inside. Open the chest to get the key for the north door. Go north to go down to the next floor.
Enemies to capture
- Slime
- Cat
Items to collect
- Healing Potion
- Small Vitality Seed
- Warp Stone
- 30 Mana Shards
Secrets to find
- Bikini Set
- Bronze Key
Recommended grind level
- 7
Castle Entrance, level 4
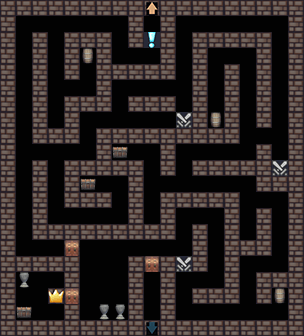
Head back out of this corridor and make your way northeast, taking on the battle event in the corner. After the battle head north, east and south respectively, until you find another battle at the dead end. Once defeated go 2 squares up and west through the fork until you reach the second chest. It’ll give you a Dancer Scrap to unlock a new outfit.
Now go east and down to the barrel in the bottom right corner for 25 mana shards. Then go all the way to the bottom left door, right through the battle event and past the door leading to the exit (One of the vases in the big room yields 25 mana shards). Enter the bottom left chamber to fight the Witch. You’ll find a Whirlwind scroll in the chest afterwards, then head on towards the next floor.
Enemies to capture
- Spear Warrior
Items to collect
- Small Resilient Seed
- 300 Mana Shards
- 25 Mana Shards
- Whirlwind Scroll
- Warp Stone
Secrets to find
- Dancer Set
- Unlock Spell (Boss)
Recommended grind level
- 10
Castle Midpoint, level 5
Immediately go into the door on the right and unlock your teleporter. Use it to go back to unlock Sylvi and your new outfits (if you hadn’t done so just yet). Also be sure to stock back up and do your “Walk around town” events.
Head north to the junction event, then west and south into the room with the first chest, in which you’ll find a swimsuit scrap. Once received, go out of the room and up by the most western corridor (Ignore the door with the stairs to the next level) and head inside the first room you find. After the battle you’ll find a warding stone in the northernmost barrel.
Go back out of the room and enter the room directly east of it. In the barrel you’ll find 50 mana shards. Ignore the other rooms in the center and head to the most southeastern room for a fight and a reviving balm from the chest.
After getting the balm head to the room directly north of this one and open the vase for 30 mana shards. Now follow the eastern corridor north and enter the room with the 3 vases and the battle event. You’ll find a mending tonic in one of them.
Now, you can’t go to the boss on this floor just yet, first you’ll need to obtain keys from both level 6 and 7. So grind some levels if you need to, then go to the room in the northwest corner to find the library and fight a level 15 sword witch and get a Fire Slash scroll as well as an Operation Spell if you defeat her.
Go back to base or head directly to level 6 (southwest staircase), your call.
Enemies to capture
- Fox Tamer
Items to collect
- Reviving Balm
- 30 Mana Shards
- 50 Mana Shards
- Mending Tonic
- Fire Slash Scroll
- Warding Stone
Secrets to find
- School Swimsuit Set
Recommended grind level
- 12
Castle Midpoint, level 6
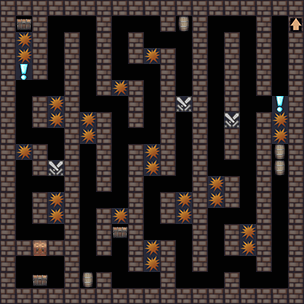
Head down to the event, then west, down, and west through the battle event. Zigzag your way down around the spikes and head into the east corridor to open the barrels for a melting tonic. choose “Just tell her.” when prompted with the choice. After that go back and make your way to the second battle event, as well as the barrel behind it. It’ll contain a warp stone that you might need later on.
Now, again, work your way west and down, avoiding the traps in your way to reach the chest in the bottom center. It’ll contain a poison dust scroll. Next you’ll have to again make your way up and west, followed by moving all the way down to the chest in the bottom chamber. The chest holds the first key to the 8th floor.
If you want an elixir (Heals and restores entire party) you can make your way up to the northwest chest to retrieve it. Make sure your party is properly healed before stepping onto the trap tiles. After this you’ll need to warp out if you don’t want to get a game over.
Head back to level 5 and take the northeast staircase to reach level 7.
Enemies to capture
- Witch
Items to collect
- Elixir
- Melting Tonic
- Poison Dust Scroll
- Warp Stone
Secrets to find
- Left Key
Recommended grind level
- 12
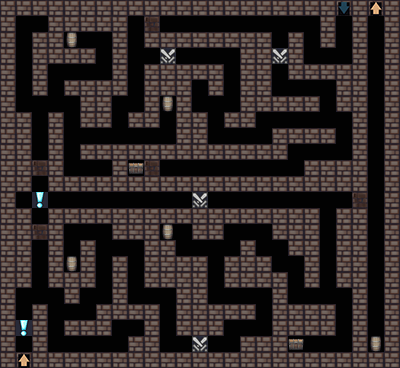
Castle Midpoint, level 7
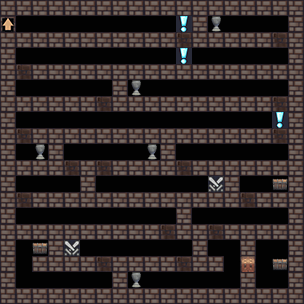
In level 7 there’s only 1 way forward until you reach the first event. Then turn right to click on the right wall to slip through. (You can see the passable walls on the image above). Ignore the vase in the top right and make your way west to the next hidden passage down. Now go back east until you hit the wall and go down again.
All this back and forth might be getting confusing but you now you have to go west and down again to break the vase. It’ll contain a small mentality seed. After getting this go back up one row and move all the way east to the event tile. Once there, go one row south, then east to clear the first battle event.
Turn around to head west, then north, west, and south again respectively. Continue zigzagging to the second battle event in the bottom left, and continue your way to the chest in the west for a meditation scroll. Then make your way to the east chamber to get the second key from the chest.
Now go out of the chamber and to the last chest just to the north for the first shard of the lucky statue. You can then warp out if you feel like it, or make your way back to level 5. Your choice.
Enemies to capture
- Warrior
Items to collect
- Small Mentality Seed
- Meditation Scroll
Secrets to find
- Right Key
- Ancient Statue #1
Recommended grind level
- 12
Castle Midpoint, level 8
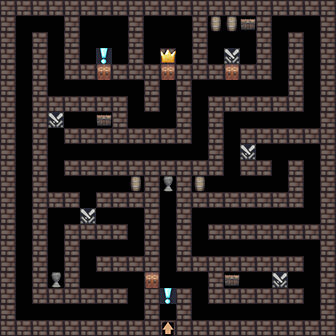
Now make your way to the chamber near the north east corner. One of the barrels will have a small dexterity seed and the chest will yield a tornado scroll. Once that is done make your way to the last chest, you’ll have to fight a level 17 witch bunny to get a bunny suit scrap from the chest. Then head for the vase in the bottom right respectively for a small resilient seed. Now make sure to unlock the door that leads back to the entrance hallway before continuing elsewhere.
If you decide to go back to base, note that the first shop battle will also be available. Then make your way through the western corridor up to the northwest room to watch the observatory event. If you’re playing the adult version it’ll also give you a succubus orb, which you’ll need for the boss room. Head for it now and meet the level 17 succubus, choose to let her have Ceri to unlock 2 CG scenes (adult version), then make your way back to her and fight her. Defeat her to unlock level 9 and Yomi.
Enemies to capture
- Sword Witch
Items to collect
- Small Dexterity Seed
- Tornado Scroll
- Small Resilient Seed
- 500 Mana Shards
- 50 Mana Shards
Secrets to find
- Bunny Suit Set
- Succubus Orb
Recommended grind level
- 16
Second Cave System, level 9
You’ll fight a level 22 Tribeswoman for a CG unlock and 2 medium strength seeds. Choose the stout bush for strength and vitality, the tea plant for a mental and a resilient seed, and the river reed for agility and dexterity. Once received, make your way back to the western end of the map, then head north through the breakable wall towards to barrel in the north for a small strength seed. Next you can navigate your way east, then south to reach the last chest hidden behind a breakable wall for your second piece of the luck statue.
Once received, head back towards the stairs leading down to level 10.
Enemies to capture
- Mud Girl
- Witch Bunny
Items to collect
- Small Strength Seed
- Poison Bolt Scroll
- 50 Mana Shards
Secrets to find
- Ancient Statue #2
Recommended grind level
- 18
Second Cave System, level 10
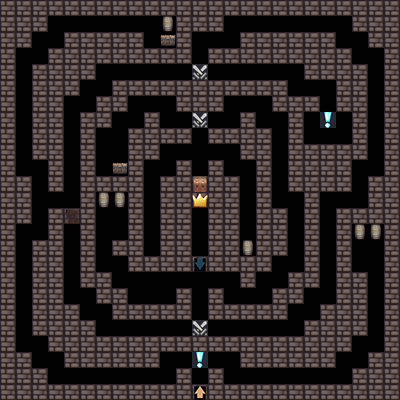
Now make your way to the inner circle and loop around to reach the event in the northeast, you’ll have to fight 3 level 18 mud girls to obtain a poison resistance seed. Then go back and break your way through the west breakable wall to get to the innermost circles. Ignore the 2 barrels in the western section but drop by the chest just north of the wall for a reviving balm, then make sure to check the last sole barrel before the boss room gate for 50 mana shards.
Head for the boss tile now to fight the level 23 tiger. You’ll get her CG after defeating her as well as access to the 11th floor. If you want to go back at least try to reach the teleporter on that floor first before heading back.
Enemies to capture
- Tribeswoman
Items to collect
- Medium Mental Seed
- Poison Resist Seed
- 50 Mana Shards
- Reviving Balm
Secrets to find
- Swimsuit Set
Recommended grind level
- 20