
- Sakura Dungeon
- Floor Guide Part 2
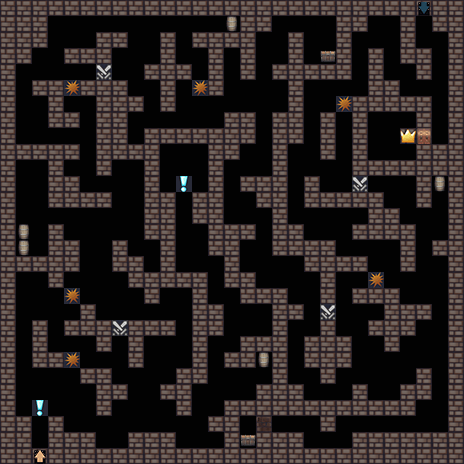
Shrine Entrance, level 11
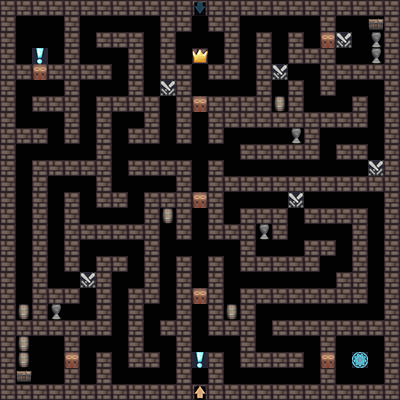
Now head towards the southwest chamber for a mending tonic in one of the 2 barrels and a Thunder Chain scroll in the chest. Followed by the vase just north of the room, it contains a healing potion. Then head to the north side of the second door to unlock that one as well.
Next up is the room + event in the northwest of the map. You might want to choose to train some more before going there if your party is low, as you’ll have to fight a level 28 monk to defeat her and obtain her CGs. Bring your strongest physical or ranged attackers as magic user get penalized by her D-Shield ability. Defeating her will also reward Yomi with the same very useful ability.
Whether you leave her for later (you can always come back) or defeat her is up to you, but I do recommend paying a visit to the bottom of the western corridor to grab a medium vitality seed from the barrel. Next is the last barrel in the north east portion of the map. It’ll contain 25 mana shards. In the north east room you’ll also find 35 mana shards and a tribal cloth scrap. Now make sure to also unlock the final and 3rd door from the north side.
The boss fight on this floor is a fairly straight forward Fox Archer pack battle.
Enemies to capture
- Fox Archer
Items to collect
- Healing Potion
- Mending Tonic
- Thunder Chain Scroll
- Medium Vitality Seed
- Warp Stone
- 35 Mana Shards
- 25 Mana Shards
Secrets to find
- Tribal Set
- D-Shield Yomi
Recommended grind level
- 24
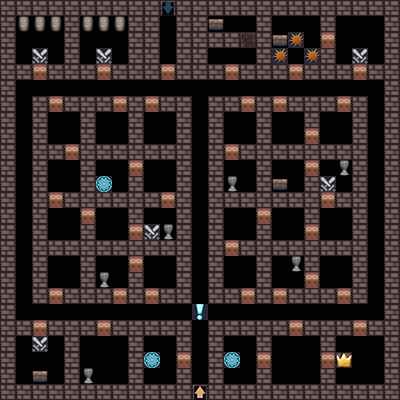
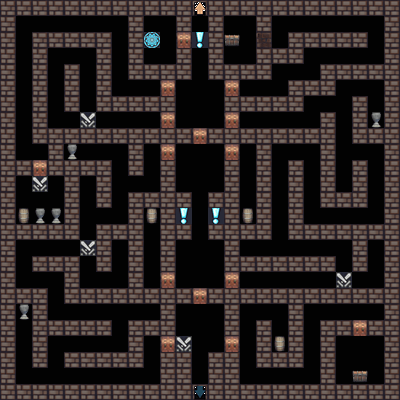
Shrine Entrance, level 12 & 13
Once there, move north to unlock the first one from the set of four doors, then head for the vase in the southwest corner for a medium agility seed. Now make your way to the northeast pitfall in this portion of level 12, and fall down. Once on level 13, make your way to the west set of double barrels for a warp stone. After that go back south to use the stairs up, then move your way to the pitfall behind the battle event, fall down, and head up the stairs again to enter the northwest section of floor 12.
Head to the event first. If you want 60 mana shards you fall down the pitfall directly east of the event tile and find the double barrel on level 13 to get them. Then head back up and go east again to make your way to the northernmost chest. Make sure to unlock the door as you pass by (avoid the pitfalls for now). In the chest you’ll find 1000 mana shards. Now find the battle event in this section and fall down the pitfall behind it. Then head back up the stairs once again.
You’re now in the northeast section of floor 12. Walk past the first 2 doors (unless you want 35 mana shards from the barrels on floor 13) and enter through the north door in the eastern corridor. Ignore the vase and make your way to the sole chest in this section for a Toxic Bomb scroll. Walk back out of the room and continue along the corridor to the barrel for 75 mana shards. Then unlock the door to the central corridor just behind you and enter the other door behind you to fall down to level 13 again.
Walk through the corridor to get up the stairs to the last section of the 12th floor. Fall down through the first pitfall that you find and get a medium resilient seed from the pair of barrels on floor 13. Get back via the stairs and head for the chest behind the hidden wall for the 3rd piece of the lucky statue. Now make sure to loop around the pitfall as you make your way to the pitfall in the southwest part of this section.
Make your way up to level 12 again and be sure to unlock the last inner corridor door (don’t fall down!), then enter the final gate to the boss fight with the level 27 Fox Miko and her 2 archers. Once done, make your way to floor 14.
Enemies to capture
- Cat Witch
- Tiger
Items to collect
- Toxic Bomb Scroll
- Medium Agility Seed
- Medium Resilient Seed
- Warp Stone
- 35 Mana Shards
- 60 Mana Shards
- 75 Mana Shards
- 1000 Mana Shards
Secrets to find
- Ancient Statue #3
Recommended grind level
- 26
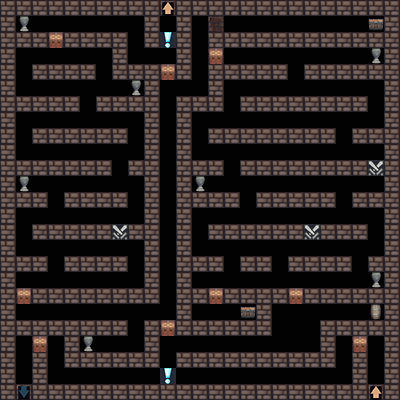
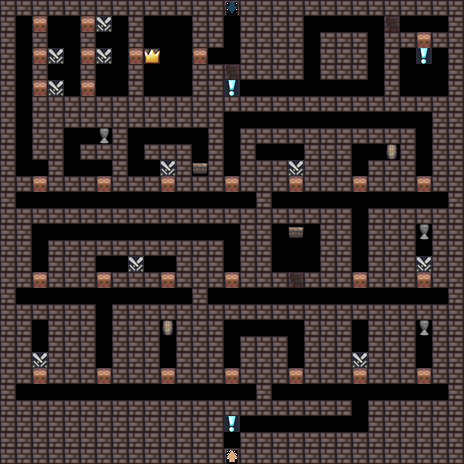
Shrine Midpoint, level 14
The 3-barreled room next to it also contains a medium dexterity seed in one of them. Next head to the room with the hidden chest for a Holy Bolt scroll. Ignore the south door to the room next to it and make for the northeast room, then make your way to the trapped room with the chest for an elixir. Now head back out and all the way south, then through the maze of rooms for the last chest. It’ll contain a tiger cloth scrap.
Next up is the second teleporter in the western maze of rooms, so make your way northwest and work your way there. Use it and head for the boss (also unlock the north door in the second chamber), to battle a level 28 Fox Miko. You’ll now have the key to unlock the north door and head down to level 15.
Enemies to capture
- Monk
- Panda
Items to collect
- Elixir
- Shock Resist Scroll
- Holy Bolt Scroll
- Medium Dexterity Seed
- Warding Stone
- 65 Mana Shards
- 700 Mana Shards
Secrets to find
- Tiger Set
- Silver Key
Recommended grind level
- 28
Shrine Midpoint, level 15
Now move east and drop by the south vase on your way for a healing potion, then continue on your way through the long corridor to unlock the north door. Next go through the hidden passage for another shard of the lucky statue, the fourth. Go back out of the passage and through the door just south of it. This’ll start another timed door unlock, so ignore everything and make your way south via the shortest route. Stick to the eastern side again and switch west just north of the second battle event as you make your way down. Ignore the chest room for now and go through the second door. We’ll get back there.
Head for the east barrel for a medium strength seed, then head for the main corridor to unlock the south door. Walk up all the way north and head into the timed room on the right once again. Stick west this time, ignoring by the western vase (only a warp stone in there) and simply go directly for the chest room to get a maid outfit scrap. Now you can either warp out or head back north out of the room, your choice.
After that’s done make your way south to the event tile, then east for the stairs leading up. You’ll have to fight a level 35 Nine Tails (Use magic resist characters if you can) to unlock her CG and the Dual-Soul ability for Yomi.
Finally, head over to the last stairs to reach level 16.
Enemies to capture
- Fox Miko
Items to collect
- Healing Potion
- Medium Strength Seed
- Warp Stone
- 45 Mana Shards
Secrets to find
- French Maid Set
- Ancient Statue #4
- Dual Soul (Yomi)
Recommended grind level
- 30
Shrine Throne, level 16
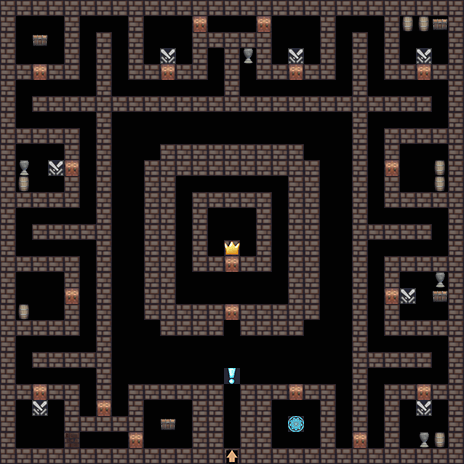
Once received, head for the room in the northeast corner and get ready for a fairly big battle. Open up the chest after the battle for a Dragon Key, which we’ll need for the northwest corner. Start making your way there and drop by the vase on the way for 90 mana shards. Open the chest once you reach the room to retrieve the Dragon Orb, it’ll weaken the floor boss’ level from 38 to 35.
Now make your way 1 room south for a medium agility seed in the center vase. The barrel one room south will contain 80 mana shards. Finally, the last chest behind the hidden wall will contain an air resistance seed. After that it’s time for the boss room in the center of the map. Make sure to use a variety of attacks on her because of her E-Skin ability.
After you defeated her add Maeve to your party (if you don’t have her already) and enter the throne room again for some knight on dragon girl action (CG Unlock). Now head back to town.
Enemies to capture
- Fox Knight
Items to collect
- Healing Potion
- Medium Agility Seed
- Air Resist Seed
- Warp Stone
- 80 Mana Shards
- 90 Mana Shards
- 1000 Mana Shards
Secrets to find
- Dragon Orb
- Dragon Key
Recommended grind level
- 34
Third Cave System, level 17

Next, you’ll have to make your way all the way southwest to the second chest for a reviving balm. You’re best of by heading all the way south first, and then turn west. Once taken, head north to the barrel just north of the chest you are at for a medium dexterity seed. Now head for the exit (remember you can always use the secret passage on this floor for quick transport), unless you want the 95 mana shards from the last barrel. In that case you’ll have some more moving to do.
Enemies to capture
- Nine Tails
- Forest Spirit
Items to collect
- Reviving balm
- Medium Dexterity Seed
- Avalanche Scroll
- 95 Mana Shards
Secrets to find
- None
Recommended grind level
- 36
Third Cave System, level 18
Now head back out and move to the double barrel just west of you. One of them holds a medium strength seed.
Next head for the second chest in the north for a Terrorize scroll. Then move all the way south to the hidden chest for another lucky statue shard. After that move back out of the corridor and then head north to the boss room. Drop by the barrel on your way for 110 mana shards. The boss is level 40 Queen Bee. You’ll need to defeat her to proceed to the next floor so train if you need to. Now head down to the next floor, we’ll come back here after level 20.
Enemies to capture
- Hammer
Items to collect
- Ice Resist Seed
- Medium Strength Seed
- Terrorize Scroll
- 110 Mana Shards
Secrets to find
- Ancient Statue #5
Recommended grind level
- 38
Pyramid Entrance, level 19
Now head into the second eastern corridor and make your way through the corridors to the door that leads into the central area. Ignore the vase on your way. In the central area, go north and unlock the eastern lever, then continue and take the eastern barrel for 125 mana shards. Head back and press the western lever this time, then unlock the northern door before going through the north west door.
In the corridor go all the way to the southwest vase for a Mending Tonic. Then go east through the door to fight a level 42 assassin. Her S-Field ability will give her more dodge chance for ranged and magic attacks. So melee attacks will have the most effect. Note that the first time after defeating her you’ll have to fight a level 35 version of her with just Yomi, the next time you head into town. But first you should head for the central corridor again to press eastern lever again. Then head down and go for the east chest for a lingerie fabric scrap. The vase in there yields nothing.
Once received, head back out and head for the next floor.
Enemies to capture
- Genie
- Wand Witch
Items to collect
- Mending Tonic
- Medium Vitality Seed
- 125 Mana Shards
Secrets to find
- Lingerie Set
- Chocolate Puzzle
Recommended grind level
- 40
Pyramid Entrance, level 20
Once in the third row of rooms, use the easternmost door to make your way west. Head for the chest first to obtain a Thunder Storm scroll. Then go one room to the west for a warp stone.
Now you can make your way through the enemies (or walk past) to the boss to take on a level 44 Noblewoman and 2 lackeys. She has a D-Shield ability as well as strong poison attacks. If you can’t defeat her you might as well consider going back to the Queen Bee on level 18 first, to recruit her with the newly received jeweled chalice. The queen bee also has high poison resistance.
If you do manage to defeat her without the queen bee, don’t forget to still go and get her. You’ll also receive a new CG if you do.
Before you go down to floor 21, make sure to drop by the hidden room in the east. You’ll find a chocolate mimic in the chest. Be sure to save before opening the final door if you’re running the adult version of the game. Choose “Try to negotiate” first, for a CG unlock.
Once that’s done load up your save and fight her this time instead (Level 45) for another CG unlock.
Finally head over to floor 21.
Enemies to capture
- Assassin
Items to collect
- Thunder Storm Scroll
- Medium Mental Seed
- 105 Mana Shards
- Warp Stone
Secrets to find
- Jeweled Chalice
Recommended grind level
- 42